I am always searching for innovative solutions to enhance the independence of visually impaired individuals. One such solution that has captured my attention many years ago was Touch Mapper, a service that allows the printing of local maps based on addresses. These tactile maps, designed for blind and visually impaired people, show roads, buildings, and bodies of water, with data sourced from OpenStreetMap. With my new 3D printer, it was finally time to put it to a test.
Scales and Sizes
Touch Mapper offers predefined scales ranging from 1:1000 to 1:9999. The smallest scale, 1:1000, is ideal for showing nearby buildings in great detail. The default scale is set at 1:2400, while 1:3200 is recommended for average suburbs. It’s important to note that the highest scale will omit minor roads to avoid cluttering the map.
There are two available sizes for the tactile maps. I opted for the 20×20 centimeter maps, the smaller size is 17×17 centimeters.
There is a dot in the very middle representing the specified address. There is also a square shape sign in one corner, though it appears there is no clear way to indicate the direction of north on these maps.
Around the House
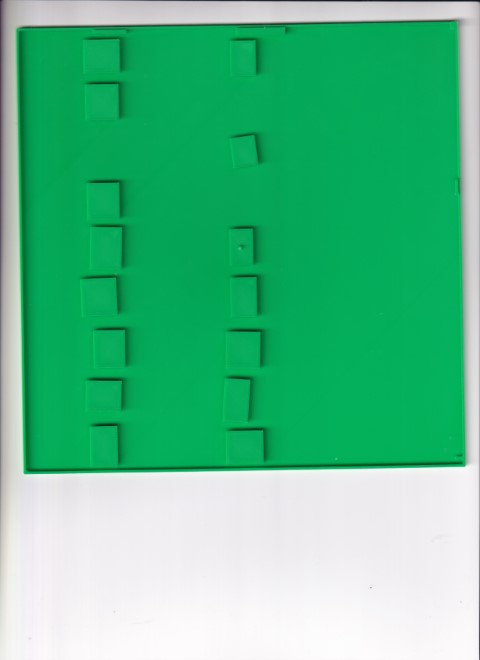
I began by printing a map of the area around my house using the smallest scale. The printing took about one hour. This map allowed me to feel the shape of the buildings on our street, providing a tangible sense of my immediate surroundings.
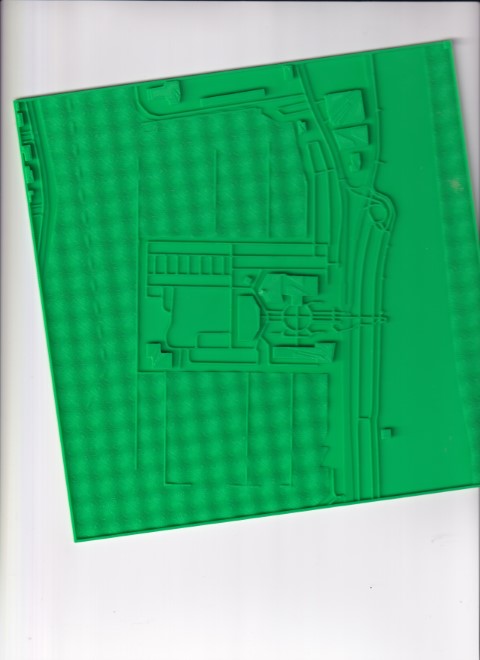
Exploring the Suburbs
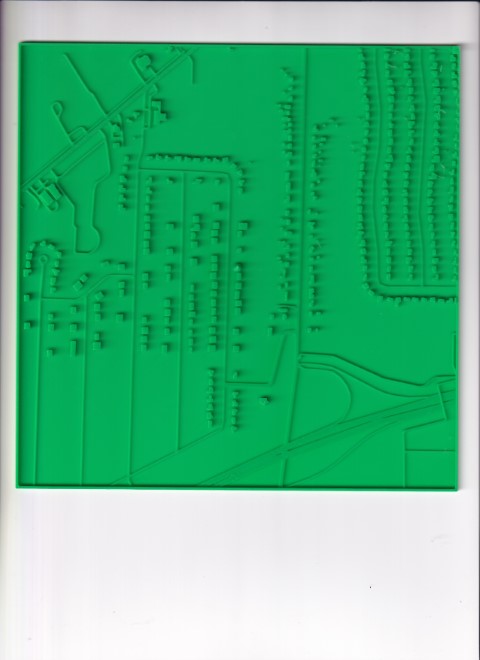
Using the 1:3200 scale, I printed a map that covered a ten-minute walking radius from my home. This scale provided a good representation of the local area, including roads and buildings, giving me a clearer picture of my neighborhood, which I already knew, so I could check the validity of the map.
Understanding Town Density
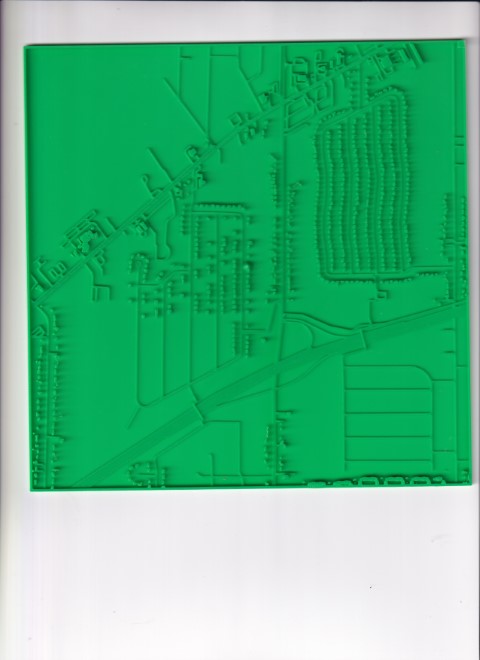
The 1:9999 scale map offered a broader view of the town, allowing me to understand the density of buildings and the layout of main roads. This map was particularly useful for getting a sense of how different parts of the town are structured.
Beach Hotel in Fort Lauderdale
I printed a map of a beach hotel and its surrounding area in Fort Lauderdale. Due to the dense and complex street structure, part of the map was challenging to interpret. However, it provided useful information about the general layout.
New York Public Library
Next, I tried printing the area around the New York Public Library. The typical New York streets, laid out in squares, were easy to feel, and this map provided the widest roads. This print helped me understand the unique street layout of Manhattan.

Technical Details
I use a Bambu P1P printer with a 0.2 layer height. The printing time for each map ranges from 1 to 3 hours, with each map weighing between 30 and 50 grams. The height of the maps is always 27 layers with these settings, but most of the printout is under 20 layers, with the dot in the middle being the highest point. Slicing the downloaded STL file was easy, I used the default settings and sent it to the printer.
Advanced Settings and Tips
Touch Mapper also offers advanced settings, allowing users to manually set the map scale, enter coordinates if the address is unknown, and choose to hide or show buildings. It’s crucial to double-check settings before printing, as the service defaults to previous configurations, such as hiding buildings or map size.
One limitation of these maps is the lack of labels, making it necessary to identify buildings and streets through other means. One approach is to save a map with the same settings to an embossing map designed for braille printers. An SVG file can then be downloaded and opened on iOS, which reads the streets and some buildings in random order with VoiceOver. This list, combined with an app like BlindSquare, can help identify intersections and buildings, though it requires some effort and patience. There is a trial and error aspect to finding the most optimal scale of the location you want to print. Using the SVG before printing can help you identify which streets you will have on the map. Given the amount of time it takes to print, it is best to start with the one that’s nearest to the expected result. If you don’t have a 3D printer, you can also order a map from Touch Mapper for $30, which is great if you get exactly what you are looking for, but expensive to find out that you were hoping for something else. Printing out a map for myself, with my settings and the PLA I use cost me a little under a Dollar in average.
I would also recommend manually labeling the back of the maps, once you end up with a handful it can be challenging to remember what’s what and scales. Because of the hight of the dot in the middle, the maps don’t stack well.
Alternatives
Since I made this post, many people are asking for TouchMapper alternatives. I wrote a response to this question.
Conclusion
While tactile maps from Touch Mapper are not enough on their own to provide a complete understanding of an environment, they are an interesting tool in the accessibility toolbox. When used in conjunction with GPS applications, these maps can enhance spatial awareness and navigation for visually impaired individuals. However, I would not rely on it for crucial tasks for example getting good directions to the doctor’s office. It is definitely not a quick and easy solution, but if you are a map/travel enthusiast and don’t mind tinkering with it for hours or days, it can be fun and hopefully useful in certain situations. Next time I’ll travel, I’ll definitely print out the surroundings of the hotel where I will stay.
Sometimes you may need a more complex map with markings, labels or individual customization. Contact us to make it for you. Also check out our tactile 3D maps./

Fascinating Tom, I love your inquisitiveness and ability to create your own solutions!
Life would be boring if everything came resolved 🙂